How to Solve Love Ladder: 4 Beginner Hints (Stage 37)
 Love Ladder The JoyPlus Soft Planning Team
Love Ladder can feel like a guessing game: drop the pieces in, press GO and see who misses. That works, but you can usually work out the whole board before pressing GO at all. Let's do it together on one real board from the game, Stage 37. Four hints come up along the way, in the order you need them, and they carry over to every board after this one.
The rules
- Each animal on top walks straight down its own line and has to reach its partner, the same animal wearing a pink bow at the bottom.
- Whenever it meets the end of a rung, it crosses over, then keeps walking down.
- Each plus slot between two lines takes one piece, and the tray holds exactly one piece per slot.
- Some pieces may not sit side by side in the same row: two single bars, two double bars, two crosses, or a diagonal up next to a diagonal down.
Before solving, it helps to know what each piece does when it is alone in its row.
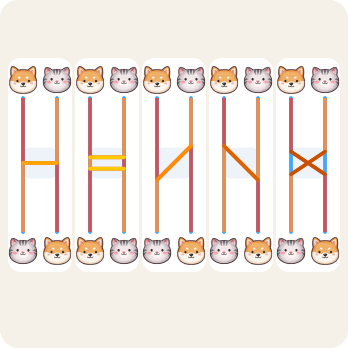
In this guide the vertical lines are numbered 1 to 4 from the left, and the slots form a top row and a bottom row.
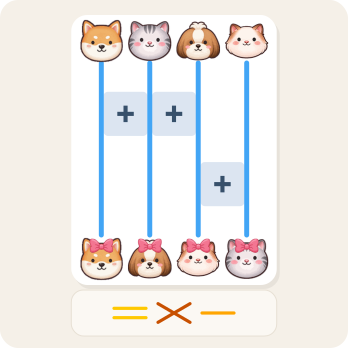
First, read the goal. The Shiba Inu stays on line 1. The Shih Tzu moves one place left to line 2, the cream cat one place left to line 3, and the grey kitten travels from line 2 all the way to line 4.
Hint 1: A line with no slot carries its animal straight down
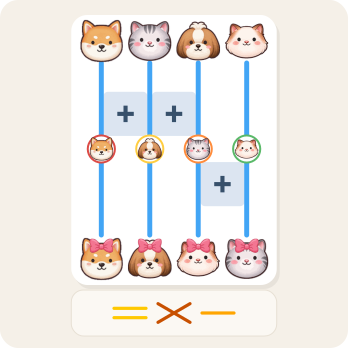
A row can only move animals on the lines its slots touch. The bottom row has one slot, between lines 3 and 4, so lines 1 and 2 pass straight through it. That means the Shiba and the Shih Tzu must already be on their partners' lines, 1 and 2, when they leave the top row. The top row never touches line 4, so the cream cat is still there after the top row. The only place left for the grey kitten is line 3.
Writing down this middle order turns one puzzle into two small ones: the top row has to turn the start into the middle order, and the bottom row has to turn the middle order into the goal.
Hint 2: Put a swapping piece between the two that trade places
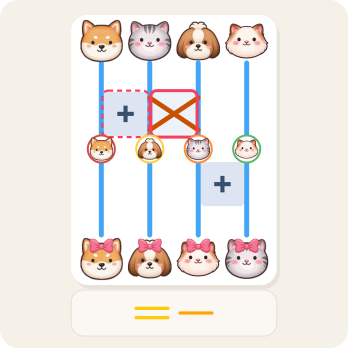
The swap happens between lines 2 and 3, so that slot needs a piece that swaps. The single bar swaps too, but next to either of the other pieces it would drag the Shiba along, so the cross goes there. The left slot has to leave the Shiba alone, and a bar right next to the cross does just that. With a double bar, the Shiba crosses over and comes straight back, as it would on its own. With a single bar, it gets carried around the cross and still ends up back on line 1. So the left slot takes one of the two bars, and the board will tell us which in a moment.
Hint 3: A slot on its own either swaps or does nothing
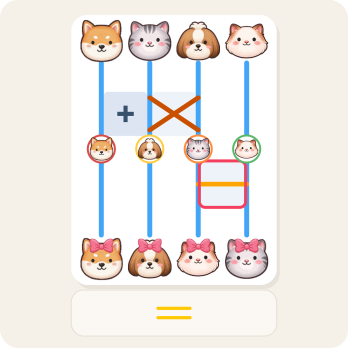
When a slot has no neighbour in its row, the choice is simple: the single bar, both diagonals and the cross all swap the two animals beside it, and the double bar leaves them where they are. Here the grey kitten and the cream cat must trade places, so it cannot be the double bar. The cross is already placed, which leaves the single bar.
Hint 4: The last piece goes in the last slot
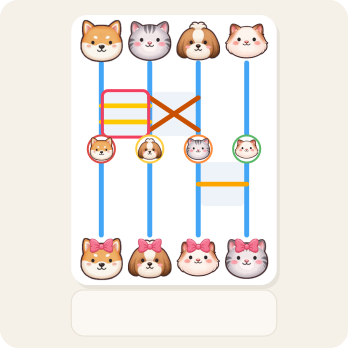
In Hint 2 we left that slot open between the two bars. Now there is one piece and one slot, and the double bar next to the cross leaves the Shiba alone, exactly as planned.
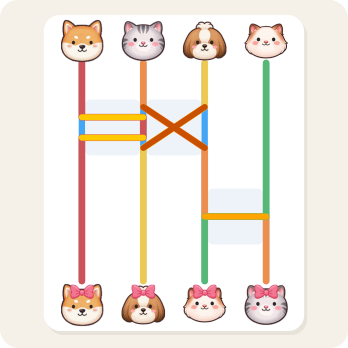
Now press GO
With all three pieces worked out, GO is just the victory lap. The same questions carry you through much bigger boards: where must everyone be between the rows, which neighbours trade places, and which slots must stay quiet. All but five of the 1,000 stages have exactly one correct arrangement, Stage 37 included, so there is always a reason behind every piece.
Habits that help
- Read the goal first: who stays, who moves and how far.
- Mark the lines a row does not touch. Animals on them pass that row unchanged.
- Write down the middle order between the rows, then solve each row on its own.
- A slot with no neighbour swaps or does nothing, and only the double bar does nothing.
- Leave a slot open when two pieces fit, and let the last pieces decide it.
Next guide
Guides for other puzzles